Parker Gun Collectors Association Forums  

Go Back   Parker Gun Collectors Association Forums Parker Forums Parker Restoration

Notices

Reply
Thread Tools Display Modes
Unread 11-22-2020, 11:34 AM   #11
Member
Pa SxS
Research Chairman
PGCA Lifetime
Member
 
Chuck Bishop's Avatar

Member Info
 
Join Date: Nov 2008
Posts: 2,914
Thanks: 1,228
Thanked 5,074 Times in 1,452 Posts

Default

The finish should be shellac so alcohol should remove it. Can't help you with the cutting the border.
Chuck Bishop is offline   Reply With Quote
The Following 2 Users Say Thank You to Chuck Bishop For Your Post:
Unread 11-22-2020, 05:29 PM   #12
Member
Cameron Thraen
PGCA Member
 
Cameron Thraen's Avatar

Member Info
 
Join Date: Dec 2019
Posts: 109
Thanks: 76
Thanked 120 Times in 39 Posts

Default

Thanks. I am thinking the finish has been refreshed with a BLO sometime in the distant past. I will clean it and remove as much as possible without a complete removal.
Cameron Thraen is offline   Reply With Quote
Unread 11-22-2020, 05:40 PM   #13
Member
B. Dudley
PGCA Lifetime
Member
 
Brian Dudley's Avatar

Member Info
 
Join Date: Aug 2011
Posts: 10,764
Thanks: 502
Thanked 18,575 Times in 4,762 Posts

Default

The borders on original parkers are lightly cut and are the first things to wear. Cleaning out the finish will not change the condition of the borders. They will have to be recut.
__________________
B. Dudley
Brian Dudley is offline   Reply With Quote
Visit Brian Dudley's homepage!
Checkering cradle
Unread 11-22-2020, 06:08 PM   #14
Member
matt koepnick
PGCA Member

Member Info
 
Join Date: Mar 2019
Posts: 150
Thanks: 698
Thanked 208 Times in 58 Posts

Default Checkering cradle

Played in the shop a little today. Managed to some what produce a copy of Brian's cradle .had to guess at dimensions and etc.seems to be a very solid set up. Having recut several wornout pieces without having this item,I can't wait to try it out.what a blessing this is. My thanks to Brian for sharing his set up.
Attached Images
File Type: jpg 20201122_165750.jpg (492.5 KB, 6 views)
matt koepnick is offline   Reply With Quote
The Following 7 Users Say Thank You to matt koepnick For Your Post:
Unread 11-22-2020, 08:30 PM   #15
Member
B. Dudley
PGCA Lifetime
Member
 
Brian Dudley's Avatar

Member Info
 
Join Date: Aug 2011
Posts: 10,764
Thanks: 502
Thanked 18,575 Times in 4,762 Posts

Default

I will let you know where to send the royalties to.

Looks good.
__________________
B. Dudley
Brian Dudley is offline   Reply With Quote
The Following 2 Users Say Thank You to Brian Dudley For Your Post:
Visit Brian Dudley's homepage!
Unread 11-23-2020, 03:01 PM   #16
Member
Cameron Thraen
PGCA Member
 
Cameron Thraen's Avatar

Member Info
 
Join Date: Dec 2019
Posts: 109
Thanks: 76
Thanked 120 Times in 39 Posts

Default

Cleaned off old finish today. Of course this revealed a split that will be sealed and closed up. Then I can start on the checkering recut.
Cameron Thraen is offline   Reply With Quote
Unread 11-23-2020, 08:00 PM   #17
Member
Craig Budgeon
PGCA Member

Member Info
 
Join Date: Jan 2016
Posts: 481
Thanks: 124
Thanked 342 Times in 208 Posts

Default

A cheap tool that one of the local pros use is fabricated from an extra long 4-40 or 5-40 screw. Generate an approximate 1/2" radius to the screw, heat works, and remove the head. Drill hole in wood dowel and epoxy the screw in the hole. I have used a 1/8" die sinkers file for many years. I ground half the file away so I could see where I was going.
Craig Budgeon is offline   Reply With Quote
Unread 11-24-2020, 01:27 PM   #18
Member
Cameron Thraen
PGCA Member
 
Cameron Thraen's Avatar

Member Info
 
Join Date: Dec 2019
Posts: 109
Thanks: 76
Thanked 120 Times in 39 Posts

Default

Craig, thanks for the reply. See next post.
Cameron Thraen is offline   Reply With Quote
Unread 11-24-2020, 01:29 PM   #19
Member
Cameron Thraen
PGCA Member
 
Cameron Thraen's Avatar

Member Info
 
Join Date: Dec 2019
Posts: 109
Thanks: 76
Thanked 120 Times in 39 Posts

Default

Craig, thanks for the reply. Will your provide some more detail or context as I am having difficulty visualizing your description of this tool? Thanks.
Cameron Thraen is offline   Reply With Quote
Fore end cleaned with discovered split.
Unread 11-24-2020, 01:37 PM   #20
Member
Cameron Thraen
PGCA Member
 
Cameron Thraen's Avatar

Member Info
 
Join Date: Dec 2019
Posts: 109
Thanks: 76
Thanked 120 Times in 39 Posts

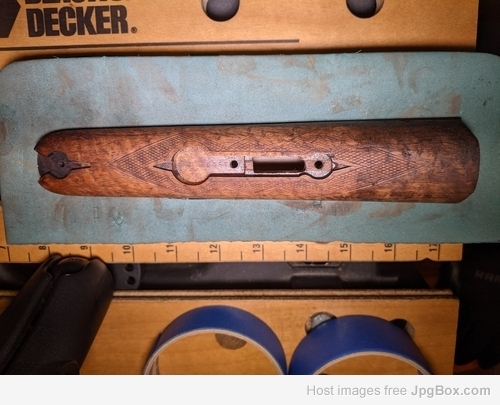
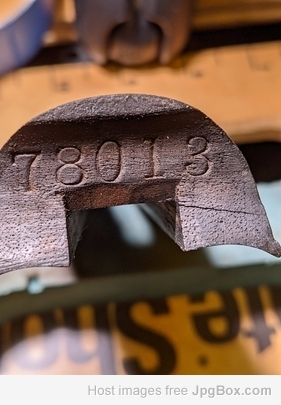
Default Fore end cleaned with discovered split.

I have cleaned the finish from the fore end and I have identified a split in the knuckle end ear that I will have to close up before proceeding with checkering.

There is a small amount of oil in the wood at the knuckle end that I would like to extract as much as possible without discoloring the wood. Any and all suggestions welcome. I have removed oil on another project gun (Lefever) but in that case I was able to work with the entire fore end wood and not just one end.

Fore end with finish removed:

Fore end split at the knuckle ear:
Cameron Thraen is offline   Reply With Quote
Reply


Posting Rules
You may not post new threads
You may not post replies
You may not post attachments
You may not edit your posts

BB code is On
Smilies are On
[IMG] code is On
HTML code is Off

Forum Jump


All times are GMT -4. The time now is 09:23 PM.

Powered by vBulletin® Version 3.8.4
Copyright ©2000 - 2024, Jelsoft Enterprises Ltd.
Copyright © 1998 - 2024, Parkerguns.org
Copyright © 2004 Design par Megatekno
- 2008 style update 3.7 avec l'autorisation de son auteur par Stradfred.