Parker Gun Collectors Association Forums  

Go Back   Parker Gun Collectors Association Forums Parker Forums Parker Restoration

Notices

Reply
 
Thread Tools Display Modes
Unread 11-27-2020, 09:10 PM   #1
Member
Cameron Thraen
Forum Associate
 
Cameron Thraen's Avatar

Member Info
 
Join Date: Dec 2019
Posts: 110
Thanks: 76
Thanked 120 Times in 39 Posts

Default

Craig, the missing piece has been away a long time as the remaining surface is worn almost smooth. Question, would you square off / clean up the mating surface to which the sliver is glued? Thanks for your interest and help. Appreciated.
Cameron Thraen is offline   Reply With Quote
Unread 11-28-2020, 11:36 AM   #2
Member
Craig Budgeon
PGCA Member

Member Info
 
Join Date: Jan 2016
Posts: 508
Thanks: 144
Thanked 388 Times in 225 Posts

Default

Cameron, we are not squaring off anything. Basically you are going to take an 1 1/2" dowel, wrapping it with 220 sandpaper, sanding at a 45 degree angle to the plane established by the 2 bore centerlines , and perpendicular to the discharge centerline. This will create a minimal uniform surface in the damaged area. Do not use commercial walnut dowels the grain direction is wrong. You have to make your dowel using either bandsaws, jigsaws, hand saws, or hole saws incorporating matching cardboard templates. Drawing this out on paper will help you get there. There should be no sharp corners making the repair this way.
Craig Budgeon is offline   Reply With Quote
The Following User Says Thank You to Craig Budgeon For Your Post:
Unread 11-28-2020, 11:45 AM   #3
Member
Craig Budgeon
PGCA Member

Member Info
 
Join Date: Jan 2016
Posts: 508
Thanks: 144
Thanked 388 Times in 225 Posts

Default

You can use Iron pipe, PVC, or any solid material to sand the damaged area as long as the templates match
Craig Budgeon is offline   Reply With Quote
The Following User Says Thank You to Craig Budgeon For Your Post:
Unread 11-28-2020, 02:00 PM   #4
Member
Cameron Thraen
Forum Associate
 
Cameron Thraen's Avatar

Member Info
 
Join Date: Dec 2019
Posts: 110
Thanks: 76
Thanked 120 Times in 39 Posts

Default

I add this photo to help show what I will be working with on this repair.

Cameron Thraen is offline   Reply With Quote
Unread 11-28-2020, 02:51 PM   #5
Member
Craig Budgeon
PGCA Member

Member Info
 
Join Date: Jan 2016
Posts: 508
Thanks: 144
Thanked 388 Times in 225 Posts

Default

Firmly grip the forend before you begin sanding the diameter. Take your time, your going to get to look at your repair a lot longer than it took to make it.
Craig Budgeon is offline   Reply With Quote
The Following User Says Thank You to Craig Budgeon For Your Post:
Unread 11-28-2020, 02:56 PM   #6
Member
Craig Budgeon
PGCA Member

Member Info
 
Join Date: Jan 2016
Posts: 508
Thanks: 144
Thanked 388 Times in 225 Posts

Default

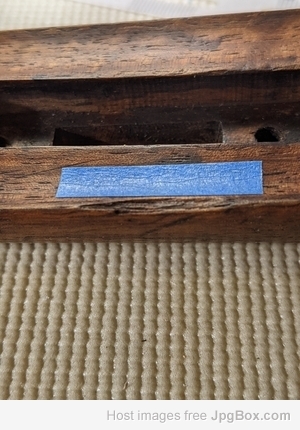
Picture a cylinder filling in the damaged area of the forend.
Craig Budgeon is offline   Reply With Quote
The Following User Says Thank You to Craig Budgeon For Your Post:
Unread 11-28-2020, 03:51 PM   #7
Member
Cameron Thraen
Forum Associate
 
Cameron Thraen's Avatar

Member Info
 
Join Date: Dec 2019
Posts: 110
Thanks: 76
Thanked 120 Times in 39 Posts

Default

Practice, practice and practice some more. Practice forend.
Cameron Thraen is offline   Reply With Quote
Unread 11-28-2020, 03:54 PM   #8
Member
B. Dudley
PGCA Lifetime
Member
 
Brian Dudley's Avatar

Member Info
 
Join Date: Aug 2011
Posts: 11,072
Thanks: 531
Thanked 19,764 Times in 4,983 Posts

Default

In strongly recommend always checkering after finish. Others feel the opposite. But to each their own.
__________________
B. Dudley
Brian Dudley is offline   Reply With Quote
The Following 2 Users Say Thank You to Brian Dudley For Your Post:
Visit Brian Dudley's homepage!
Unread 11-28-2020, 04:11 PM   #9
Member
Cameron Thraen
Forum Associate
 
Cameron Thraen's Avatar

Member Info
 
Join Date: Dec 2019
Posts: 110
Thanks: 76
Thanked 120 Times in 39 Posts

Default

I agree. This is my practice forend. Amazing how the cutter head has a mind of its own. Parker in the background. I am still trying to get my head around fixing the barrel border divot as described by Craig.
Cameron Thraen is offline   Reply With Quote
Unread 11-28-2020, 04:14 PM   #10
Member
Cameron Thraen
Forum Associate
 
Cameron Thraen's Avatar

Member Info
 
Join Date: Dec 2019
Posts: 110
Thanks: 76
Thanked 120 Times in 39 Posts

Default

Ok, clearly not the dowel but am I getting the idea? Use the actual walnut grain matching dowel to sand the barrel tunnel to have it's margin blend into the walnut dowel. Then using only a sliver of that dowel, glue it in and shape away any part to create a new barrel tunnel? Am I even close in my understanding?


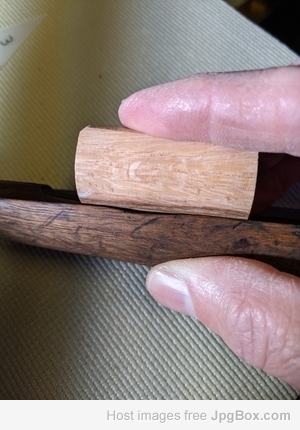
(Read Craig's response below. The orientation of the dowel is off 90 degrees)
Cameron Thraen is offline   Reply With Quote
The Following User Says Thank You to Cameron Thraen For Your Post:
Reply


Posting Rules
You may not post new threads
You may not post replies
You may not post attachments
You may not edit your posts

BB code is On
Smilies are On
[IMG] code is On
HTML code is Off

Forum Jump


All times are GMT -4. The time now is 09:49 AM.

Powered by vBulletin® Version 3.8.4
Copyright ©2000 - 2025, Jelsoft Enterprises Ltd.
Copyright © 1998 - 2025, Parkerguns.org
Copyright © 2004 Design par Megatekno
- 2008 style update 3.7 avec l'autorisation de son auteur par Stradfred.