
|
| |||||||||||||||||||||||||||||||||||||||||||||||||||||||||||
 09-20-2009, 09:12 PM
|
#13 | ||||||
|
Here is the center section of the stock face that is in contact with the receiver. As stated before, it has been my observation that the factory wood-to-metal fit often isn't as tight here, as evidenced by a slightly thicker (a few thousandths) layer of epoxy being observed here when a bedding job is completed. I'm not saying they didn't have any contact, just maybe not quite as good as around the outer edges, and not necessarily on every gun. There is also a very small thin area in contact with the receiver around the edges of the center, square-shaped inletting that is provided for the bolt to retract when the gun is opened (see the shiny areas around the square inletting in the center). Glass-bedding takes advantage of all available surface area to distribute recoil force over.
I should mention here that the rough, bubbly appearance of the bedded areas is due to the fact that the release agent is still partially adhered to these areas. The underlying epoxy is nearly as smooth as a milled surface, but the thin layer of release agent still stuck to it makes it look rough under this magnification. The release agent will be all removed before final assembly. :[IMG] 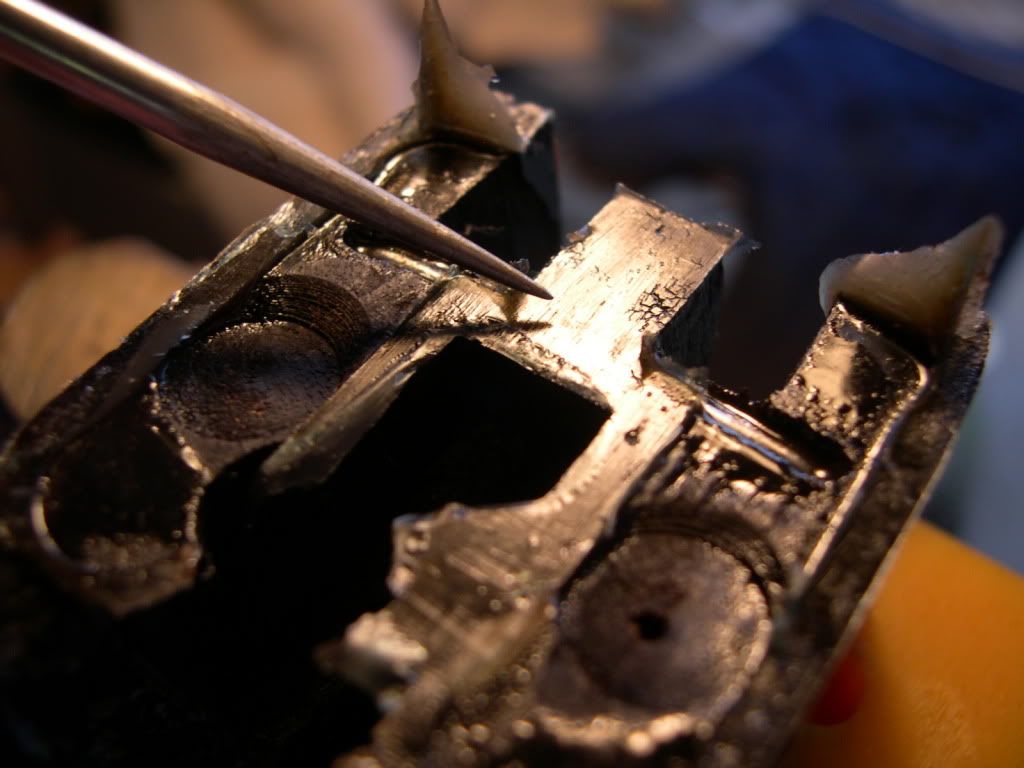 [/IMG] [/IMG](I should take another photo with the back of the receiver paired next to the bedded stock for a better visual of the available surface area for contact - I'll try to do that). Last edited by Jim Williams; 09-20-2009 at 09:59 PM.. |
||||||

|

|
||||||
|
09-20-2009, 09:19 PM
|
#14 | ||||||
|
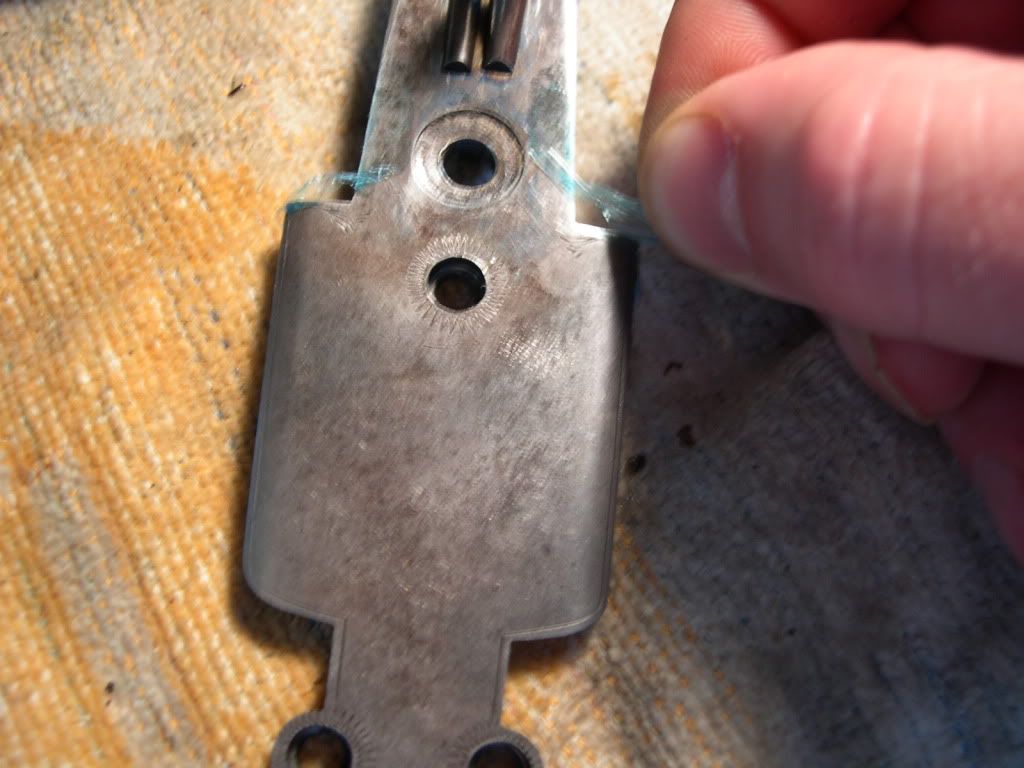
Don't forget to put release agent on the small part of the trigger plate that comes in contact with the wood when assembled (I have, but remembered before I tried to assemble it to the stock which had the epoxy already applied.) To forget could lead to a stuck triggerplate. Here's the release agent being removed from the mentioned area:[IMG]
 [/IMG] [/IMG]
|
||||||
|
|
|
||||||
|
09-20-2009, 09:40 PM
|
#15 | ||||||
|
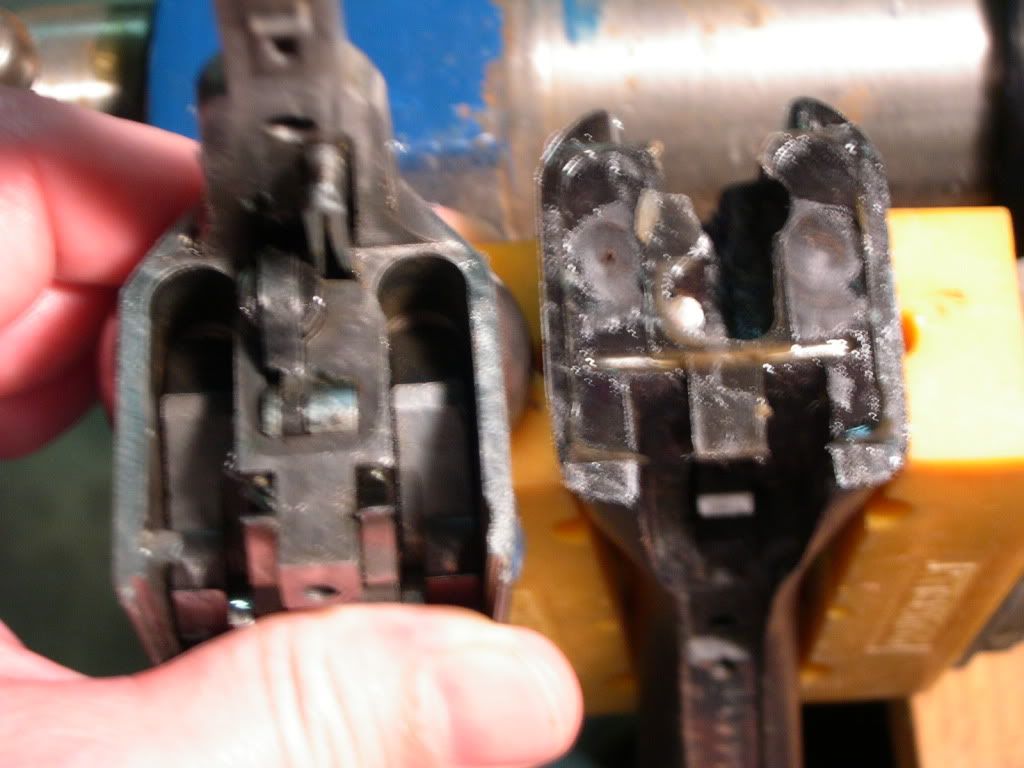
OK, here's a quickly-taken, poorly-focused shot comparing the back of the frame to the stock. It makes it apparent where the areas of wood-to-metal contact are (at least the available areas for contact). Keep in mind that much of that metal in the center may not actually be in 100% tight contact if it hasn't been bedded - something to think of when you shoot heavy loads with heavy recoil. On the plus side, this small amount of contact area is huge compared to a lot of sidelocks! The next step will be to clean up all the release agent still stuck to the epoxy, and sand/grind away the flashing where the epoxy has been squeezed out. More later: [IMG]
 [/IMG] [/IMG]
|
||||||
|
|
|
||||||
|
09-21-2009, 09:15 AM
|
#16 | ||||||
|
Nice Job, Jim
|
||||||
|
|
|
||||||
|
09-21-2009, 12:23 PM
|
#17 | ||||||
|
Thanks everyone.
I just realized that one of my pics fortuitously illustrates the observation I made earlier about the original wood-to-metal contact being typically better around the edges of the stock than in the center, thereby concentrating recoil force around the outer surface. In the pic below (post-bedding), the stockface wood is very dark brown since it has been previously saturated with thin CA glue to seal/toughen it prior to the bedding. The epoxy is a lighter, caramel color. In the areas where the wood-to-metal contact is very good, the epoxy gets squeezed almost entirely out and the resulting layer left behind is so thin it is transparent and the dark brown wood underneath shows right through. In the areas where the fit is not as good, less epoxy gets squeezed out leaving a thicker layer behind to fill the gap. The thicker areas show up as the caramel color of the epoxy itself, since it is too thick to be transparent and the dark wood underneath is not visible through it. The red arrow indicates the thicker area of epoxy near the bottom of the square-shaped piece of inletting, and you can see the fit is better just above where the caramel color gives way to the dark brown wood underneath as you move upwards towards where the staple is placed. It is also apparent that there was a good fit all around the edges of the stock because those areas show no appreciable thickness of the Acraglass. In the circled area a smaller area of thicker epoxy is visible where the fit wasn't as good. Glass-bedding fixes these areas on poor contact, of course.[IMG] 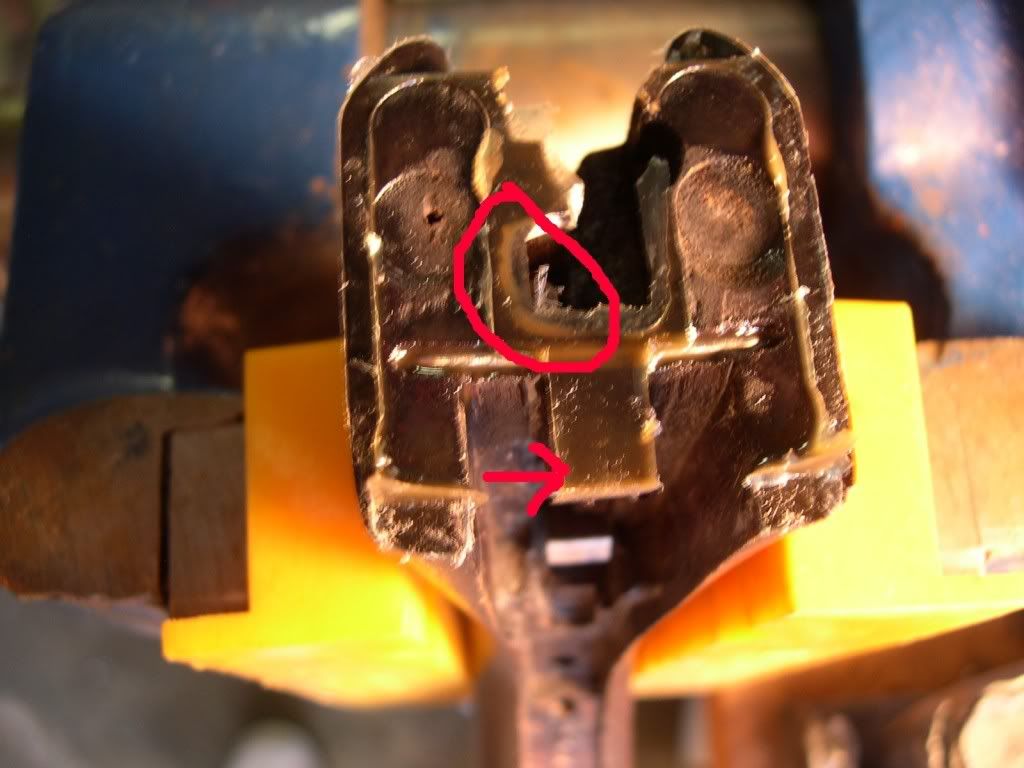 [/IMG] [/IMG]
|
||||||
|
|
|
||||||
|
09-21-2009, 12:41 PM
|
#18 | ||||||
|
Jim
What do you use to finish the stock? I had the unpleasant eperience of looking at an almost new DHE 12 this weekend that the owner has refinished with a "hand rubbed oil finish" that looked like poly. I went to see the stock man and he told me he mixed resin in with 3 types of oil to get that nice shiny finish. David |
||||||
|
|
|
||||||
|
09-21-2009, 01:41 PM
|
#19 | ||||||
|
David,
I'm not sure I'm the best one to answer that question because I just stick with what I know (which is labor intensive). I use a oil/poly blended product called Permalyn (available through Brownell's) for sealing and filling the grain. It comes in a Sealer for initial coats, and a Finish for building up the finish. There is a very similar blended product called Pro Custom Oil that I hear good things about. After I've completely filled the grain with multiple wet-sanded coats, I give it a final wet-sanding (using the Permalyn Sealer as the lubricant) with 320 wet/dry, wiping it clean as I go. I use Galazan's Pre-64 Winchester stain which I think is a pretty good match for Parker color, and I use it ON TOP of the Permalyn. When dry, the final finish is Napier's Oil, which is an English product and it is a proprietary blend of all natural oils. It goes on right over the stain and it goes on very, very thin. In fact, only a few drops will do a coat for the entire stock, then I use nylon stockings (because they are lint-free) to wipe off almost all of it while it is still wet, and then rub it out with my hand to get an even sheen. It takes 3 or 4 of these cycles to end up with a good, consistent-all-over appearance, and it avoids any sanding-through of the stain (a very hard thing to fix). One day I'll try and master the French Polish technique used by many here. It is far less labor intensive, is true to the original finish, and looks pretty good from the examples I've seen. Austin Hogan has written extensively on that technique. It's on my to-do list one day. I experimented with it some, but had trouble filling the grain and couldn't get a streak-free finish, but I admit I haven't given it enough effort yet to give up on it. I learned everything about the technique I use from a master stockmaker who is a good friend and lives nearby. He has said on many occasions that anytime stockmakers get together at a show, the hot topic is always "what finish technique are you using?" It seems everyone is always looking for a better look and an easier job. In the meantime, here's a couple of mine finished with the technique described:[IMG]  [/IMG] [/IMG]
|
||||||
|
|
|
||||||
|
09-21-2009, 01:56 PM
|
#20 | ||||||
|
Jim
Thanks-That is what I expect a hand rubbed oil finish to look like. I have used Austin's french polish to touch up some areas and for that it is great. David |
||||||
|
|
|
||||||
 |
| Thread Tools | |
| Display Modes | |
|
|


 Linear Mode
