| Author | Post |
|---|
Trevor Shurtz
Member
| Joined: | Mon May 26th, 2008 |
| Location: | |
| Posts: | 14 |
| Status: |
Offline
|
|
Posted: Mon May 26th, 2008 11:03 pm |
|
| I recently was given a 1900 GH #1 Frame 12 gauge with Damascus barrel by my grandfather that has seen her time in the woods through the years. She’s in pretty rough shape as far as looks go but is sound. Anyway, the sears do not seem to be cocking and I have a feeling that the flat sear spring is broken. I am somewhat of an amateur gunsmith of sorts and like to do my own work. any who, I was trying to find out how I can take apart the action and get to the trigger group, but didn't want to just start taking things apart knowing with some firearms they are put together with jigs and pieces can go flying. What is the easiest/safest way I can get this thing apart and check out the internals? I would really like something with pictures, but it is not necessary. Thanks.
|
Austin W Hogan
PGCA Member
| Joined: | Fri Feb 1st, 2008 |
| Location: | |
| Posts: | 440 |
| Status: |
Offline
|
|
Posted: Tue May 27th, 2008 12:08 am |
|
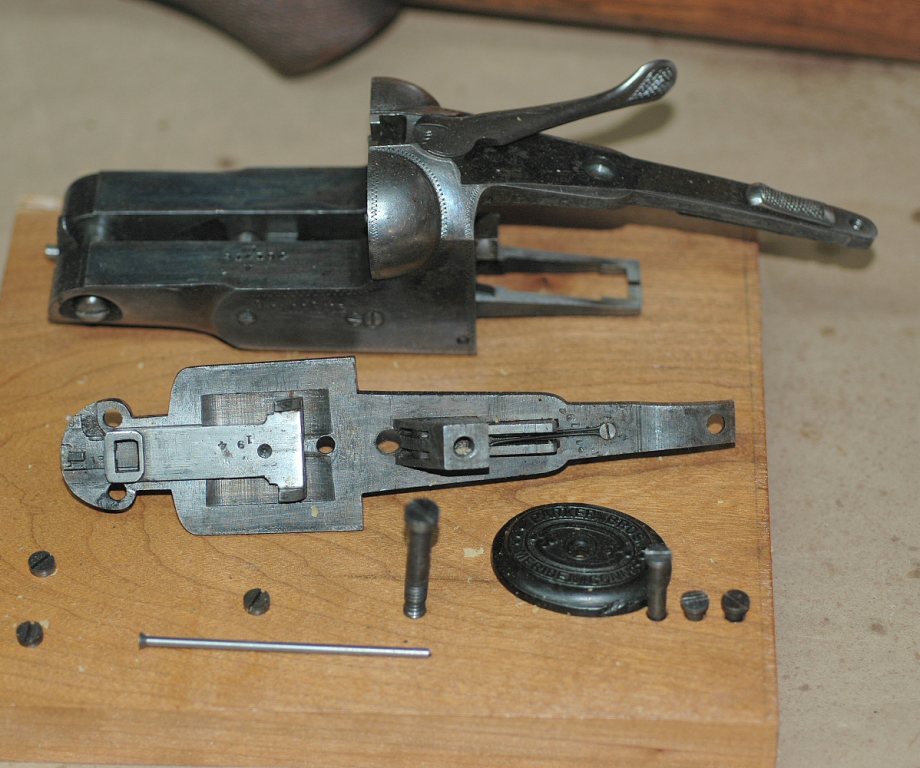
Make yourself a screw board like the one shown, to keep your parts in alignment. Clamp the frame in a padded vise when you work on it. Many Parker frame screws are narrow slots, but quite deep. Check this when you file your screwdrivers.
Best, Austin
Attached Image (viewed 1074 times):
|
Trevor Shurtz
Member
| Joined: | Mon May 26th, 2008 |
| Location: | |
| Posts: | 14 |
| Status: |
Offline
|
|
Posted: Tue May 27th, 2008 10:14 pm |
|
| so i can pretty much take the bottom plate off to get to what i need to? thanks
|
Carl Brandt
PGCA Member

| Joined: | Wed Jan 12th, 2005 |
| Location: | Virginia |
| Posts: | 289 |
| Status: |
Offline
|
|
Posted: Tue May 27th, 2008 10:51 pm |
|
Directions that might help. Copied from a post by Dave Miles on Jan 1, 2008:
"These are the directions I had saved to my hard drive:
Removing the stock isn't all that difficult, but it does require a few tools and a LOT of care. The most important things you will need are a screw driver or three that actually FIT the different sized screws, a non-marring drift pin to drive out the sear pin, and a non-marring hammer (plastic-faced, etc). The first step is to dry fire the gun on snap caps, remove the fore end (so as not to re-cock the hammers), and then remove the barrels. Next is to remove the screw in the trigger guard (by the serial #) and gently lift the guard from it's inletted bed (pushing forward on the guard may help), then unscrew the guard from the trigger plate by revolving the whole guard around the front stud about 4-5 turns. Under the trigger guard you will find another screw head which you can remove next (the tip (other end) of this screw is visible on the top tang by the safety). Next, you can remove the large screw under the top lever. This requires a different size screw driver. Next, remove the three screws in the trigger plate. (Note: it may be easier to remove these screws if you only break each screw loose sequentially, a little at a time. If you completely loosen them one at a time, the last screw may be under an uneven strain and be more difficult to break loose). After these screws are out you turn the receiver over and use a wooden dowel, or a non-marring soft-metal drift inserted into the rear of the slot in the water table and tap gently to drive the trigger plate from the bottom of the frame. At this point the stock will become very loose and floppy on the receiver, but you CANNOT remove it yet! Be very careful as the trigger plate comes out, making sure that the stock doesn't jump around and break some of the wood in the fragile head portion. Also be sure to catch the cocking slide which rides just inside the trigger plate**. Once the trigger plate is off, the final step is to remove the sears. If you try to remove the stock without removing the sears, you WILL break the stock. This is the reason you let the hammers down before you even began. Pay careful attention to how the sears are oriented (draw a picture if you have a poor memory). The sear pin is visible on either side of the outside of the frame at the lower rear corner. Using a drift slightly smaller than the sear pin, carefully drive it out the other side of the receiver, removing each sear as it is cleared by the pin. You may now remove the stock. There will be a few parts left in the stock (safety mechanism, automatic safety rod, mainscrew ferrule) but it is not necessary to remove these for normal cleaning. You can clean the receiver out with your favorite gun solvent, then blow the crud out with compressed air. After it is clean to your satisfaction, spray the inside with something like RemOil, wipe most of it out, and add a drop of gun oil to each joint between moving parts. While you're at it, now would be a great time to add a coat of sealer (like Tru-Oil) to the inletting in the head of the stock, to keep gun oil from ruining the wood. Don't let it collect in puddles anywhere, because the fit between wood and metal is a close tolerance.
Re-assembly is the reverse of the above, except that you must make sure to engage the safety slide on the tang with the safety lever in the stock as you slide the receiver back into the stock. This is a little tricky, so make sure it works properly before continuing. The sears go back in next, the pin is driven through, and the cocking slide is put in place to engage the cocking hook and hammer notches, then the trigger plate is put into place and tapped with a plastic-faced, etc. hammer until it is fully seated. After that, it is just a matter of replacing screws.
Do all work with the receiver firmly supported in a vise with soft jaws. To not do so is to invite ruined screw heads, broken inletting, etc. There are a few operations (like removing the sear pin) that will be easier out of the vise, but be very careful! For screw drivers, you need the hollow-ground tipped ones, and will likely have to shape the tips with a file a little to get proper fit in the slots."
** In addition to the cocking slide, keep an eye out for the trip spring and pin which may also leap out. For identification of these parts see the "Technical Information" section of this BBS. Cocking Slide is #13 and the trip spring and pin #20 (aka: Paker Poker - what you push to return the top lever for breakdown storage of the gun).
Last edited on Tue May 27th, 2008 11:10 pm by Carl Brandt
|
Trevor Shurtz
Member
| Joined: | Mon May 26th, 2008 |
| Location: | |
| Posts: | 14 |
| Status: |
Offline
|
|
Posted: Fri May 30th, 2008 03:53 am |
|
| thanks for the help guys, but now i feel pretty stupid. i finally really started looking at the gun before digging into it and realized that the cocking link is pretty warn down and just slipping off of the crank and making somewhat of a cocking sound. i was able to carefully manually cock it tonight with some success. i went ahead and ordered a new link as well as a sear spring to hold on to. is there anywhere i can get a complete screw set, because my parker has obviously been through a few hands. thanks again for all the info guys.
|
Harry Collins
PGCA Member
|
Posted: Fri May 30th, 2008 10:57 am |
|
Trevor,
Screws can be found here http://www.connecticutshotgun.com . I bet you will find the sears OK, but may be a little dirty and a good cleaning will do wonders.
Harry
|
David Purnell
PGCA Member

| Joined: | Sat Oct 29th, 2005 |
| Location: | Albany, Georgia USA |
| Posts: | 470 |
| Status: |
Offline
|
|
Posted: Wed Apr 22nd, 2009 03:18 pm |
|
| Instructions for disassembly.
|
Trevor Shurtz
Member
| Joined: | Mon May 26th, 2008 |
| Location: | |
| Posts: | 14 |
| Status: |
Offline
|
|
Posted: Wed Apr 22nd, 2009 10:56 pm |
|
| does anyone know if this set includes the cocking link screw or know where i can find one?
|
Chris Travinski
PGCA Member
| Joined: | Wed Mar 22nd, 2006 |
| Location: | Connecticut USA |
| Posts: | 221 |
| Status: |
Offline
|
|
Posted: Wed Apr 22nd, 2009 11:22 pm |
|
It doesn't.
|
Harry Collins
PGCA Member
|
Posted: Thu Apr 23rd, 2009 02:08 am |
|
Trevor,
Most of the problems I've found in Parkers turned out to be "dirt" that had accumulated over the years. I hope this is the case with your Parker.
Harry
|
Trevor Shurtz
Member
| Joined: | Mon May 26th, 2008 |
| Location: | |
| Posts: | 14 |
| Status: |
Offline
|
|
Posted: Thu Apr 23rd, 2009 03:19 am |
|
| well the cocking link is definitely not connecting with the action. however, the screw that acts as a pin for the cocking link is shot and i need a replacement before i can remove the old one and replace the link.
|
David Benson
Member
| Joined: | Sat Mar 21st, 2009 |
| Location: | Anamosa, Iowa USA |
| Posts: | 8 |
| Status: |
Offline
|
|
Posted: Thu Apr 23rd, 2009 06:23 pm |
|
try this web site. I have used it for my 1883 Parker, hammer 10 gage.
http://www.e-gunparts.com/products.asp?chrMasterModel=1850zDOUBLE%20BARREL%20HAMMER&MC
|
Trevor Shurtz
Member
| Joined: | Mon May 26th, 2008 |
| Location: | |
| Posts: | 14 |
| Status: |
Offline
|
|
Posted: Tue Apr 28th, 2009 04:17 am |
|
| they do not have this screw available. anyone have any other ideas of where i might be able to get one? or know what type of screw(size and pitch) i would need to go there?
|
Trevor Shurtz
Member
| Joined: | Mon May 26th, 2008 |
| Location: | |
| Posts: | 14 |
| Status: |
Offline
|
|
Posted: Sun May 24th, 2009 05:57 am |
|
| anyone? I can't really move forward without a new cocking link screw or some info about it
|
Richard Flanders
PGCA Member

|
Posted: Sun May 24th, 2009 06:50 am |
|
What's 'shot' about it? Perhaps you could have it spray welded or micro welded then turned back to diameter? Someone on the forum knows who does that kind of stuff; I can't remember who it is.
|
Greg Baehman
PGCA Member
| Joined: | Sat Jul 30th, 2005 |
| Location: | |
| Posts: | 216 |
| Status: |
Offline
|
|
Posted: Sun May 24th, 2009 12:15 pm |
|
| PGCA forum member Lou Rotelli can probably either fix or make one for you.
|
Jim Williams
BBS Member
| Joined: | Sun Feb 27th, 2005 |
| Location: | |
| Posts: | 554 |
| Status: |
Offline
|
|
Posted: Mon May 25th, 2009 07:24 am |
|
I've seen the innards of lots of well-worn Parkers, but never heard of a worn out cocking link. I'm sure it happens, but also be looking for something else. You DO realize that with the gun disassembled (forend off) the cocking linkage is disabled so that the barrels can be removed, right? The pin that protrudes from the front of the receiver knuckle has to be pushed fully in (normally by the forend iron when it is installed) for the cocking linkage to hook up. You can manually make the linkage hook up with the barrels even with the forend off, though.
What are you calling the "cocking link"? There are three main parts - the "cocking hook", which is attached to the barrel, the "cocking link bellcrank", which is visible in the center slot of the receiver water table, and the "cocking slide", which falls out when you remove the floorplate. If you are talking about the cocking hook on the barrel, that flush-fitting screw with the big wide head will probably have to be made. The advice to contact Lou Rotelli is good for that situation.
On the other hand, if you are talking about the cocking bellcrank in the action, the screws you are looking for ARE included in this set. assuming you are talking about the right ones. Just to be sure: On the side of a Parker frame there are three screws per side, the rear-most is the hammer axle screw. Right next to it is its lock screw. Finally, the forward-most is the cocking bellcrank screw. In the following link, there is a pic of a Parker with an inset showing the screw set. On the pictured gun, the cocking bellcrank screw is just under the letter "s" in "Parker Bros." In the inset pic of the screw set, at the bottom-right there are four tiny ones grouped together. The cocking bellcrank screws are the top two of those four. The almost non-existent shaft (only a couple threads) is almost the same diameter as the head, making them look like just tiny heads with no shaft. The reason they are this way is that they don't actually support the link. The link is supported on a floating axle inside. The screws are just caps on each side to cover the hole that the axle is inserted in. If you want to remove the cocking link (bellcrank), you will have to remove the hammers and mainsprings unfortunately, because the wells for the mainsprings are lateral to the axle (which is fairly short, not much wider than the link itself). When you remove the cocking link cover screws, if you insert a small diameter punch in the hole you will be touching the mainspring, not the axle. You have to remove the mainsprings so the axle can then be drifted out. Check out the screw set, and recheck that you really do have a worn-out link before removing it:
http://www.csmcspecials.com/ProductDetails.asp?ProductCode=PS020
If you do have to remove the hammers and mainsprings, make sure you know how. There is a lot of tension there, and there is a proper technique to do it to prevent damage to the gun or yourself. I can walk you through this too, if necessary.
Jim
Last edited on Mon May 25th, 2009 08:25 am by Jim Williams
|
Trevor Shurtz
Member
| Joined: | Mon May 26th, 2008 |
| Location: | |
| Posts: | 14 |
| Status: |
Offline
|
|
Posted: Mon May 25th, 2009 05:13 pm |
|
| it's what you are refering to as a cocking hook that is worn and the flat head screw that holds that to the barrel and acts as a pin. It is part #23 on Numrich's website http://e-gunparts.com/productschem.asp?chrMasterModel=1850zHAMMERLESS and they are calling it a cocking link. That is why i have been refering to it as so.
|
Jim Williams
BBS Member
| Joined: | Sun Feb 27th, 2005 |
| Location: | |
| Posts: | 554 |
| Status: |
Offline
|
|
Posted: Mon May 25th, 2009 07:47 pm |
|
In case you ever need it, there is an "official" Parker parts call-out on this website. From the Home page, on the left column there is a link to a Technical Information page. That page will have a diagram of all the parts and a key with their "official" name.
What I call a cocking bellcrank, they simply refer to as a cocking crank. Most of the time when people mention "cocking link", it is this part they are referring to.
You might call the Del Gregos and ask if they know the dimensions and thread of the hook screw. They probably have several, but I don't think they sell parts.
Another possibility would be from a junked set of barrels, if you could get lucky enough to find a set.
Wait a minute...now that I think about it, Galazan (CSMC) is selling NEW sets of Parker retro-fit barrels. That means they HAVE to have those Cocking Hook Screws on hand and are manufacturing them for the new barrel sets, right? Unless they have changed the specs for that screw for manufacturing purposes, that might be a source for a brand new screw. I'd give them a call and plead your case.
Is there any way you can post pics of that wear on the hook that you are talking about? That is unusual. Thanks,
Jim
|
Trevor Shurtz
Member
| Joined: | Mon May 26th, 2008 |
| Location: | |
| Posts: | 14 |
| Status: |
Offline
|
|
Posted: Tue May 26th, 2009 02:54 am |
|
| i will try and take a picture to post tomorrow, thanks
|

Current time is 06:52 pm | Page: 1 2   |
|