|
Clicking on pictures will allow them to be
viewed enlarged
- Remove forend and Barrels.

- Uncock the action. It is best to dry fire against a block of
wood. Or with snap caps before barrels are removed.

- Note: It is very important to make sure that the screw
drivers you use are the correct gunsmith style ones and that they are the
correct size. You must do your best to have the bit tightly and fully
fill the screw head slot. Top to bottom and side to side.

- Remove trigger guard screw. There is one (1) screw for pistol grip
stocks and two (2) screws for straight grip stocks.

- Swing the trigger guard to the side, counterclockwise.

- Remove the trigger guard if you wish. Most times this requires
depressing the front or both triggers to allow the guard to clear them on
the first few turns.
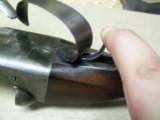
- Remove the rear tang screw that was exposed by removing the guard.

- Move the top lever over to expose the front tang screw.

- Remove the front tang screw.
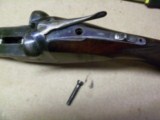
- The trigger plate screws are next. There are 3 of them.

- Remove the 3 trigger plate screws. Make sure to note the location of
them and that they go back where they came from to maintain proper screw alignment.
The rear screw is longer on some models. And one of the front screws will
have a groove filed in the bottom of it. Note which side this screw with the
groove came from in case you get them mixed up. I have seen this screw
be on either side of the gun. However I it was on the left side from
the Parker factory.
Hint: If your screws are not indexed correctly, try them in different
holes and see if they line up better. Chances are they might have
gotten mixed up in the past. 
- Remove the trigger plate. This can be difficult due to the extremely tight
fit. I find it best to tap it loose from the top through the groove in
the water table. Use a wood dowel or other such object to do this with
as to not damage the plate. Once tapped loose, it can be wiggled free
from there.

- Remove the cocking slide.

- Remove the trip pin. This can easily fall out and get lost
if it is not removed before the gun is tipped back upright.
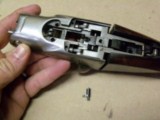
- Drive the sear retaining pin out in order to remove the sears. Use a
punch (preferably brass) to do this. Do not remove the stock until both
sears are removed.

- After the removal of the sears, the receiver will pull away freely. If the
safety jacket needs be removed, it simply taps out from the bottom
side. If the safety reset slide need be removed, you must first
unscrew the front tang screw collar with a thin screw driver and then the
reset pin will fall out.

- Reassembly is the reverse of this process. Care must be taken to
make sure that the safety lever and button slide are aligned before putting
the sears back in place.
Additional tips:
- To help prevent wood chips breaking out of the stock head as the sear pin
is removed:
A bungee cord (or surgical tubing) wrapped between the standing breech and
butt plate will hold the action to the stock when the bottom plate is
removed. This tension will allow removal of the sear pin and sears without
allowing the action to move around on the stock head and potentially chip
off some of the old thin wood.
Once the pin and sears are out, remove the bungee cord and the action can be
carefully taken from the stock. Safely as well.
- Another disassembly quick tip... take a pin that is a little smaller than
the sear pin (use a finish nail that has the point rounded off) after dry
firing the gun and before disassembly, drive the sear pin out leaving
smaller drift pin in its place. Then when you get to removing the
sears, just pull it out with your fingers. This is also a big
advantage while assembling the gun, as you can push the smaller drift in
place while positioning the sear with other hand. When the gun is back
together, just tap the sear pin back in, driving the temp pin out.
<--
back
|


