
|
| ||||||||||||||||||||||||||||||||||||||||||||||||||||||||||||
 06-17-2014, 01:42 PM
|
#53 | ||||||
|
This post is all about making up a working extractor for the 20g. hammer gun.
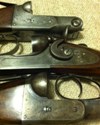
But first, a little background. The barrels I installed on the hammer gun frame were intended to be for a hammerless ejector gun. However, the kickers were not in the barrels. The hole in Ejector barrels for the kicker shafts are a larger diameter than the hole in Extractor barrels for the extractor guide. Also, there is no set screw in the locking lug of ejector barrels since the rib extention is milled out for a stop plate in order to prevent the kickers from falling out. Given all those differences between ejector and extractor barrels, some modifications would be in order no matter what I did to get a working shell extractor. I had been looking for a little while for a 20g. extractor that I could modify. However, I found that the shape of the extractor blade is different than that of a pair of ejector kickers. So that was not a viable option. The only other option I had using used parts would be to fuse together a pair of 20g. ejector kickers and use them as the extractor in my barrels. But... as we all know, finding an orphaned pair of ejector kickers for an 0 frame 20g. would be a little hard, so I didnt even try too hard. I had an NOS unfitted extractor laying around that was oversized enough to be used for a 1 or 0 frame in 16 or 20g. So I did what it took to make this one work. This is what I started with. IMG_3392.jpg First I had to remove the extractor shaft from the blade since it is too small in diameter to use in the ejector barrels. IMG_3394.jpg Then I could fit up just the blade to the barrels without having to worry about the shaft. I had to narrow the blade and work the top radius some to get it to fit in tightly. IMG_3396.jpg Then I could shape the radius in the bottom to match the barrel flats. IMG_3397.jpg After the blade was fitted, I thinned it down flush with the breech and I drilled a hole in it that corresponded with the shaft hole in the barrels and plug welded the shaft to the blade. Then dressed down the weld. IMG_3398.jpg IMG_3399.jpg The extractor blade as new had a small hole drilled in it for the guide pin. But The barrels did not have a guide pin hole since ejector barrels do not use a guide pin. So I had to drill out the barrels for the guide pin with the extractor in place. IMG_3400.jpg I then turned down a piece of rod the same diameter of the drill bit for a guide pin. With the hole in the blade countersunk, I was able to insert the guide pin and plug weld it in place. Then dress down the weld. IMG_3401.jpg IMG_3402.jpg IMG_3403.jpg IMG_3404.jpg Here is the fitted extractor with shaft and guide pin installed and in the barrels. IMG_3405.jpg IMG_3406.jpg Then I had to remove the excess material in the chamber area. IMG_3407.jpg Finally, The extractor set screw hole could be drilled out and tapped. A new set screw was made and the extractor shaft notched for it. IMG_3408.jpg IMG_3409.jpg I am going to end up sending the barrels out to have the chokes opened up and the bores/chambers checked and lapped. The shell rims will be cut in at that time.
__________________
B. Dudley |
||||||

|

|
||||||
| The Following 21 Users Say Thank You to Brian Dudley For Your Post: |
|
06-20-2014, 07:53 PM
|
#54 | ||||||
|
Mr. Dudley you are truly a craftsman !!!
__________________
"Every Day is Good...Some are Just Better than Others" |
||||||
|
|
|
||||||
|
08-02-2014, 06:00 PM
|
#55 | ||||||
|
Brian, what does the B on the barrel lug signify? Thanks again for your continued posting on this project. Your workmanship continues to be flawless and I am sure admired by all of the PGCA membership.
|
||||||
|
|
|
||||||
|
08-02-2014, 09:47 PM
|
#56 | ||||||
|
I am not sure. It was a mark that was on it when I got it. Likely from. Remington when the barrels were made.
__________________
B. Dudley |
||||||
|
|
|
||||||
|
08-05-2014, 11:13 AM
|
#57 | |||||||
|
Quote:
|
|||||||
|
|
|
|||||||
| The Following 3 Users Say Thank You to Kevin McCormack For Your Post: |
|
08-08-2014, 11:43 PM
|
#58 | ||||||
|
I think this is my all time favorite thread. Keep working, keep photographing, keep posting!
|
||||||
|
|
|
||||||
|
08-09-2014, 11:25 AM
|
#59 | ||||||
|
Brian, who is going to do the cutting of the rim recess? I was reading the post waiting for pictures of you doing it, but I guess you're not going to do it. Thanks for any information you can give me.
|
||||||
|
|
|
||||||
|
08-09-2014, 04:45 PM
|
#60 | ||||||
|
I took the barrels to Turnbull to have the rims cut and the bores/chambers polished. I have all the tools to do this for 12g, but not for 20g. Just haven't bought them yet.
I figure that since the barrels were new manufacture and never fitted, I would have them all gone over and make sure they are good to go. The bores are a very tight 20g and the choke as they are is about. .007" in both bores. I wish they had been both full choked as I would have liked to have the left a little tighter. But I can live with the open chokes.
__________________
B. Dudley |
||||||
|
|
|
||||||
 |
| Thread Tools | |
| Display Modes | |
|
|


 I'll quit before the others start throwing things!


 Linear Mode
