Parker Gun Collectors Association Forums  

Go Back   Parker Gun Collectors Association Forums Non-Parker Specific & General Discussions Shotgun Shell Reloading

Notices

Reply
Thread Tools Display Modes
10 gauge roll crimping video
Unread 03-06-2011, 05:48 PM   #1
Member
Cal Lego
Forum Associate
 
Cal Lego's Avatar

Member Info
 
Join Date: Feb 2011
Posts: 21
Thanks: 4
Thanked 8 Times in 3 Posts

Default 10 gauge roll crimping video

One of the other guys posted a video on loading and trimming down a 10 gauge shell. What a great looking folded crimp too.

So, I went down to my messy garage and made a short video of roll crimping using Precision's tool in the drill press.

Here's the link.

http://www.youtube.com/watch?v=VcpNmVyiFkk
Cal Lego is offline   Reply With Quote
The Following 6 Users Say Thank You to Cal Lego For Your Post:
Unread 03-06-2011, 07:45 PM   #2
Member
charlie cleveland
PGCA Member

Member Info
 
Join Date: Jul 2009
Posts: 12,986
Thanks: 0
Thanked 7,795 Times in 3,967 Posts

Default

cal you make that look to easy....very good crimp...thanks for making the vidio.... charlie
charlie cleveland is offline   Reply With Quote
Unread 03-06-2011, 07:53 PM   #3
Member
Cal Lego
Forum Associate
 
Cal Lego's Avatar

Member Info
 
Join Date: Feb 2011
Posts: 21
Thanks: 4
Thanked 8 Times in 3 Posts

Default

Quote:
Originally Posted by charlie cleveland View Post
cal you make that look to easy....very good crimp...thanks for making the vidio.... charlie
Yer Welcome on the video making. It is kind of fun being able to do such a thing. What a world we live in...

Yeah, I was pretty surprised at how good it worked.
Cal Lego is offline   Reply With Quote
Unread 03-07-2011, 07:53 AM   #4
Member
ch
PGCA Lifetime
Member
 
calvin humburg's Avatar

Member Info
 
Join Date: Dec 2009
Posts: 1,816
Thanks: 1,654
Thanked 640 Times in 351 Posts

Default

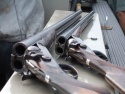
Well I was going to put these pictures on a thread found this one so I guess I'll add these to Cal's since it's about rollcrimping. This old tool is not as easy as Cal's but works.

Rollcrimping short 10 with spreader for overshot wad. You have to adjust your filler wad so shot is down in shotcup far enough so the 12 gauge spreader will fit into the cup to center it. I also shortened my hull a little more with that handy dowell and exact-o-knife blade.calvin's pics 366.jpg


calvin's pics 370.jpg
Had picture problems as you can see try to get better one tonight
Attached Images
File Type: jpg calvin's pics 369.jpg (3.2 KB, 100 views)
calvin humburg is offline   Reply With Quote
The Following 3 Users Say Thank You to calvin humburg For Your Post:
Unread 03-07-2011, 09:27 AM   #5
Member
Harry Collins
PGCA Member
 
Harry Collins's Avatar

Member Info
 
Join Date: Nov 2008
Posts: 1,911
Thanks: 9,940
Thanked 1,757 Times in 732 Posts

Default

Calvin,

That is how I do mine as well.

Cal,

Great video!

Harry
Harry Collins is offline   Reply With Quote
Unread 03-07-2011, 10:13 PM   #6
Member
Cal Lego
Forum Associate
 
Cal Lego's Avatar

Member Info
 
Join Date: Feb 2011
Posts: 21
Thanks: 4
Thanked 8 Times in 3 Posts

Default

That is a real nice looking tool. Looks like it makes a great crimp.

I have one but it puts a squarish looking crimp on the shell and the button in the center isn't big enough to make the center push out towards the edges far enough. It's like someone made a 10 gauge by reaming out a 12 gauge tool.

I know a guy who has a good one but he won't cut loose of it!
Cal Lego is offline   Reply With Quote
Unread 03-08-2011, 12:23 PM   #7
Member
Steve Havener
Forum Associate

Member Info
 
Join Date: Feb 2011
Posts: 168
Thanks: 1
Thanked 68 Times in 56 Posts

Default

Cal old time roll crimp tools came in three types, one gives a nice rounded finish, the second (which it appears you have) gives a squared off finish and the third was a convertible type that can be changed from rounded to square. As far a what I believe you are saying about the center not pushing out toward the edges far enough try adjusting the shot wad column up and down a bit to see if that will give you a cleaner crimp. Without seeing the actual crimp it sounds as if you need to raise the wad/shot column a bit. I try to adjust my shot/wad column so that the overshot card is 1/4 to 3/16 inches but not less than 1/8th inches from the case mouth.
Steve Havener is offline   Reply With Quote
Unread 03-08-2011, 03:53 PM   #8
Member
J.B. Books
PGCA Member
 
Pete Lester's Avatar

Member Info
 
Join Date: Jun 2009
Posts: 2,866
Thanks: 1,645
Thanked 4,804 Times in 1,370 Posts

Default

It think it would be nice if we could put the Sherman Bell loads PDF, the loading short 10 video and the roll crimping video into a single thread and that thread made into a "sticky" titled. "How to load the 2 7/8" 10 gauge".
Pete Lester is offline   Reply With Quote
The Following 3 Users Say Thank You to Pete Lester For Your Post:
Unread 03-08-2011, 05:28 PM   #9
Member
charlie cleveland
PGCA Member

Member Info
 
Join Date: Jul 2009
Posts: 12,986
Thanks: 0
Thanked 7,795 Times in 3,967 Posts

Default

im all for it.... charlie
charlie cleveland is offline   Reply With Quote
Unread 03-08-2011, 06:34 PM   #10
Member
Bindlestiff
PGCA Lifetime
Member
 
Robin Lewis's Avatar

Member Info
 
Join Date: Nov 2008
Posts: 2,118
Thanks: 703
Thanked 2,924 Times in 869 Posts

Default

Question, is the content of the PDF under copyright? I would assume it belongs to DGJ?
Robin Lewis is offline   Reply With Quote
Reply


Posting Rules
You may not post new threads
You may not post replies
You may not post attachments
You may not edit your posts

BB code is On
Smilies are On
[IMG] code is On
HTML code is Off

Forum Jump


All times are GMT -4. The time now is 10:41 PM.

Powered by vBulletin® Version 3.8.4
Copyright ©2000 - 2024, Jelsoft Enterprises Ltd.
Copyright © 1998 - 2024, Parkerguns.org
Copyright © 2004 Design par Megatekno
- 2008 style update 3.7 avec l'autorisation de son auteur par Stradfred.