
|
| |||||||||||||||||||||||||||||||||||||||||||
 03-09-2012, 07:03 PM
|
#23 | ||||||
|
brad: nice to hear from an expert.
"We utilize over 20 different process formulas to yield specific colors and patterns by brand and era" a question. after quench do you ever temper back a receiver to increase elasticity, so as to avoid the possibility of cracking under the stress of firing? or is this step not necessary under your processes? |
||||||

|

|
||||||
|
03-09-2012, 07:05 PM
|
#24 | ||||||
|
edgar: thanks for your input. i always learn from your posts.
|
||||||
|
|
|
||||||
|
03-09-2012, 11:32 PM
|
#25 | ||||||
|
I have no intention of representing my work as a metalurgist. My goal is to simply replicate the structural and cosmetic entity that these guns represented. When I hear of accounts of temps at 1500 t0 1700 degrees, Iam concerned as to the damage that some people are doing to these precious guns. The utilization of blocking and fixturing techniques to achieve certian patterns is wrong, if you think that the original manufacturers did this, you are wrong. Case hardening just did that. It imparted hardness to soft steel, in a machineable state. The people that did this process were interested in a certian apperance as much as a structural benefit.
Each of them were craftsmen, not metalurgists. There individual goals were to establish a trademark look, different than the competion. They certianly accomplished that. You can Church up or tech up the process as much as you want, the truth remains that the colors and patterns are a result of the process application, the craftsmens work. Brad |
||||||
|
|
|
||||||
| The Following 8 Users Say Thank You to Brad Bachelder For Your Post: |
|
03-09-2012, 11:53 PM
|
#26 | ||||||
|
[QUOTE=Brad Bachelder;64478] Two prime examples of this in Parkers are the center band of color on triggerplates at the point of machineing for the cocking slide. The centers of the water table flats at the hammer spring pockets.
Brad, thanks for answering the questions I had wondered about in the above quote. When I try and determine original Parker colors, those two things are what I try to analyze. Sometimes the center band of color may or may not be real noticeable but the water table flats usually are. Perhaps you can also comment on an observation concerning recased colors is that usually the recased colors have too much straw around the edges of the frame where darker Parker colors go right to the edge. Parkers had very little straw colors in my opinion. |
||||||

|
|
||||||
| The Following User Says Thank You to Chuck Bishop For Your Post: |
|
03-10-2012, 12:01 AM
|
#27 | ||||||
|
Bruce,
What's the maufacture date on that B grade? My DH, made in 1903, has almost all of it's original case colors and from a distance you'd swear the receiver was blued until you got up close, then the dark blues and reds started to become apparent. |
||||||
|
|
|
||||||
|
03-10-2012, 03:59 AM
|
#28 | ||||||
|
Just to be clear, My comments were not intended to represent myself as a gunsmith, experienced or otherwise. A gunsmith is truly a craftsperson. Any temperature ranges I quoted are from experience from production methods used in the heat treatment of steels, in a cast state. Ultimately, the desired hardness and ductility was the determining factor is arriving at them. The colors were a byproduct of the surface hardening to prevent wear of the newly engraved surfaces. Machining and engraving is done while the part is in a softer, annealed state, and the final combination of the parts hardness, strength and ductility aren't achieved until all heating/ cooling cycles are done. The craftsman are those that take the basic information, and modify it to the desired end. The temperature ranges I quoted are, in fact those used by Colt, as explained to me by their personnel, when arriving at an alloy for their boxes. It's important to note that they were the first normalizing cycles the parts were exposed to, and not necessarily those a gun being restored would see. As the old adage says "The proof of the pudding is in the eating". Anyone who is able to replicate the colors imparted as the original manufacturer offered up, in my book, is the guy who gets my vote, and Brad Batcheldor's work, in my estimation, represents the best i have seen out there.
As many of us have seen in the last few weeks, The upcoming James Julia auction has a half dozen Colt Calvary models coming up, whose colors are as close to original, if they aren't actually original. That I believe they are actual Colt restorations, it makes no difference, as their work today is no different than it was 120 years ago. Long before they had a department called 'The Custom Shop', my dad had Colt restore a martial piece, and it looks today just like those shown in the Julia auction, no more, no less. |
||||||
|
|
|
||||||
| The Following 4 Users Say Thank You to edgarspencer For Your Post: |
|
03-10-2012, 09:55 AM
|
#29 | ||||||
|
Chuck,
Excellent observation, Parkers are overall very dark. The absense of straw, green and yellow are due to packing material, run temp and quench. Parkers colors are subtle and washed unlike the vivid multi-hue colors of late production Smiths. In fully engraved Parkers with 90% original colors it very hard to see any color at all. Brad |
||||||
|
|
|
||||||
| The Following 2 Users Say Thank You to Brad Bachelder For Your Post: |
|
03-11-2012, 02:01 AM
|
#30 | |||||||
|
Quote:
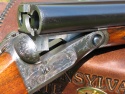
Every pro I have ever talked to case colors their frames fully assembled, right down to the screws in the timed position. I have seen a couple examples of frames that were case colored while disassembled, and the results were poor and obvious. Picture a jig saw puzzle of colorful scenery with several pieces force fitted in the wrong places. The colors didn't flow or match across the seams, top lever and screw heads. Definitely not professional results. Dr Gaddy and CSMC case colored fully assembled frames, and Dr Gaddy used stainless steel perforated shielding to concentrate colors and regulate patterns with great success. I have copied his methods with good repeatable results too. The factories didn't do that, according to Dr Gaddy, because they quenched many frames at once and that held the charcoal against the frames during the quench, which is criticial to achieve colors other than gray. For guns like Parkers where vivid colors and jagged patterns are not desired, I have devised a different process where the steel is kept fully embedded in the charcoal mix during the entire quench. I have only tried it on one Parker, my own mismatched G grade shooter with decent, but not perfect, results. Photo below. I suspect that colors first wear off the bottoms and edges of guns for the same reason why bluing wears off trigger guards, triggers and safety buttons first--because those areas all receive the most handling wear. Also, the application of more protective lacquer in some areas over others could have something to do with it too. Additionally, some prior owner of the gun might have deliberately polished the colors off certain areas of the gun while leaving them in others to achieve a desired "look".....who knows? In any event, I do find case coloring to be a fascinating process, and look forward to learning as much as I can about it. Last edited by Justin Julian; 03-11-2012 at 12:08 PM.. Reason: typo |
|||||||
|
|
|
|||||||
| The Following User Says Thank You to Justin Julian For Your Post: |
 |
|
|


 Linear Mode
