We've all seen these guns for sale - often in beautiful shape except for a pin, dowel or even a bolt through the stock head, cheek-to-cheek. This was a common way to repair a common problem with Parkers and other fine doubles - a split stock head. It is an effective way to repair the damage, but a horrendous one in terms of aesthetics and value. It is also totally un-necessary. The stock can be repaired internally with all repairs invisible when the gun is reassembled. I learned this technique years ago when I read "Shotgun Technicana" by Trevallion and McIntosh. Many of you have seen this "staple" technique before, but I offer this pictorial as a work-in-progress for those who haven't seen it before. It has worked very well for me in the past, and I consider it necessary medicine on any stock I repair that has any significant cracking. Occasionally I'll refinish a stock with no visible cracks. For these I'll wick very thin Cyanoacrylate (CA) glue into all the inletting areas to stabilize any invisible or incipient cracks, and to seal the inletting from gun oil. Then I'll just glass bed the action to the stock and forego the staple, the thinking being that if the stock hasn't cracked yet in the past 100 yrs., and the CA glue and glass bedding will make it even that much more resistant to cracking, it should be fine. But if there are any cracks that are significant enough for movement, they get the staple.
The first step (not shown) is to repair the wood itself, and return it to it's original fit and stabilize the cracks with the appropriate adhesive. When cracks can be closed completely (no wood missing) through simple clamping and the fit is perfect, I use CA glue. The very thin formula will wick into cracks so tiny that they can be invisible. There is a medium viscosity formula that works better for larger cracks where small gaps may be present. Finally, when big chunks are broken out that must be replaced, Acraglass (an epoxy) is the best choice. Of course none of these work well if the wood is oil-soaked - you must get that out of the wood first. I've had stocks that separated into as many as five chunks of broken inletted wood when the receiver was removed. If they are all there, they can be carefully fit back together like a puzzle with the Acraglass, then the CA used to wick into the hairline cracks afterwards. This particular project is an 0-frame stock off of the VH 20 I grew up with (my first shotgun, given to me by my great uncle when I was 8). Before these pics were taken, all the chunks of broken inletting and cracks were glued as described above, and the fit to the receiver has been checked and found to be good (in fact I did that last year, and shot a few rounds of skeet, wobble trap, and a couple quail hunts while I had it reassembled). Satisfied with the fit and repair, I have disassembled it again to make the repairs permanent (staple, glass bed, then re-finish, re-checker, etc.) and get the gun finished for this year's season.
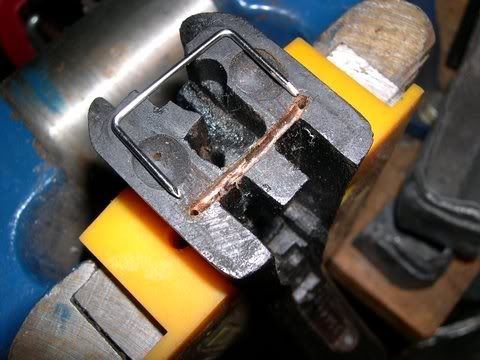
In the first pic, you can see the staple has been made from 1/16" stainless rod (actually, this is a cut-off from a surgical steel orthopedic Steinman pin, the remainder of which I installed in some dog's fractured leg somewhere along the way). On the face of the stock head, you can see the holes drilled for the "legs" of the staple, and a channel cut across the face of the stock to allow the crossbar of the staple to sink down below flush. Placement of the legs should be into the meatiest portion of the stock cheeks, and care must be taken to drill vertically to make sure that both leg-holes are parallel (and to make sure you don't drill out the side of the cheek). Hole-to-hole distance must match the dimensions of the staple legs precisely. Once the holes are drilled, a straight edge is used to scribe the borders of the cross channel across the face, then the channel is routed using a small burr in a rotary tool. The depth of the channel must be deep enough to allow the crossbar of the staple to fit below flush with the face of the stock (in order to avoid interference with the receiver fit). Also, where the channel meets each leg-hole, it must be radiused down into the hole to allow for clearance of the inside radius of the bend on each leg of the staple:
[IMG]
[/IMG]


 Threaded Mode